Showing posts with label Addons. Show all posts

Saturday, 10 October 2009

The Arts of Jewelcrafting

Hello there, today I will be talking about, as the title says, jewelcrafting! I leveled it long ago and have several times decided to start making some serious gold with it but it has always ended up with returned gems and so on, but now I have decided to really start to work it, and this time I wont fail. How do I know this? Well, it's simple. This time I will use macros.

I've mentioned Kev Tool Queue (or KTQ) a few times but I don't think I've ever made any description of it. It's pretty simple really, it allows you to queue up items in skillet by making a command in the chat window. It goes like this:
/ktq queue number keyword

The "number" and "keyword" are replaced with other stuff depending on what item you want to queue. Let's say I want to queue 3 inscribed monarch topaz(es?) I just write:
/ktq queue 3 inscribed monarch topaz
But usually it's enough with:
/ktq queue 3 inscribed monarch
as the addon searches for items that contains the keyword and will add all that do so to the queue.

There is also a function that allows you to queue up all glyphs by using "glyphs" as the keyword. I got to admit I'm not happy sharing this but as it's very important for my buisness I can't give you more detailed info without telling you about this addon. Also Kevmar posted it on his blog and I don't doubt he got a lot more readers than I do.

But that's not all, by using altoholic KTQ will see how many of the items you want to queue you have and will only make as many as you need to go up to the desired amount. So lets say I have two Inscribed Monarch Topazes and write:
/ktq queue 3 inscribed monarch
the addon will only queue up 1 gem which will put me at 3 in total.

So what does this have to do with macros? Well, lets say I make a macro that says:
/ktq queue 3 inscribed monarch
/ktq queue 2 rigid king's amber
/ktq queue 2 delicate scarlet ruby

By clicking it I will instantly queue up the needed amount of gems to fill up my stock to the desired amount. By having every blue gem I can make that got at least some profit potential in this macro (two actually) I can keep restocking on gems as soon as I sell one. Just today I've sold a bunch of gems and have started to liquidate my huge stock of blue gems. I am right now above 19 000g and may even hit 20k tomorrow. Unfortunantly I got a lot of glyph crafting to catch up with (my daily sales are starting to get below 100g!), it's been a tough week and I haven't had time for much crafting but I may be able to fill up tomorrow.

Wednesday, 7 October 2009

1vs2

Due to a request in the comments I decided to replace all pieces of lua code in download links to make it easier to compare to the .lua file used by quick auctions 2. Sorry about the 60 second wait to download but it was the first thing I found. If you don't get what I'm talking about you will when you read the rest of the post.
Ink is the thing with inscription that matters the most when setting prices, or to be more precise, ink of the sea. Snowfall also plays in here by reducing the IoS price but in the end it all comes down to the IoS. So what every scribe tries to do is to reduce their ink cost in one of 2 ways:
1. Either they reduce the cost of their herbs or
2. they sell their snowfall ink or uses it to make cards, offhands or, since the patch, runescrolls. There are two points in reducing the price, both to get more profit of each glyph and, to me the more important of the two, to make you able to undercut lower than your competition.

Pretty simple and common knowledge to most scribes, but there is one more thing to it, something I should have done long ago. While most glyphs have the requirement of 1 ink of some kind (= ink of the sea) and 1 parchment. But of course that's not all, many glyphs use 2 inks, making the price the double - 15c to 50s depending on the parchment used as it still only takes one parchment.

So to not loose money you'd have to put your glyph threshold at the cost of 2 ink of the sea plus 50s. Considering most of your glyphs only requires one ink this is a huge loss of how deep you can undercut, so what is the solution? If you thought of making two diferent QA categories you were completly right. But how are we going to do it? Checking every single glyph up would take stupid amounts of time and you's have to check every new one you learnt up before adding it to your group. The solution is on the JMTC forums!

In the thread linked a few of the great people there are discussing how you could set up QA2 to post 2 ink and 1 ink glyphs separately, and they found a way to do it! Just a bit down on the first page Debussy posted a list to paste into your Quick Auctions file in the saved variables folder.

To find it you just go to your WoW folder, open the WTF folder, choose account and open the folder with the same name as your account (it's usually only 1) and then got to Saved Variables (it may be a bit hard to find but it's there). Inside that folder there is a bunch of text files, find the one named QuickAuctions and open it. There you go, but I reccomend you make a copy of it in another folder before trying this.

Download

That's the code, now you just have to put it in the file, or do you? While this piece of code is completly correct, there is one way to improve it, and it has already been partially done by j on the third page:

Download

As he says, you are supposed to paste the code after this part. But as a none programmer you may find this part hard to get right, at least I did. If you can't find this part remember that all information about your groups is stored in this part making it look diferent for every user. The important part about this code is:
["groups"] = {

If this part gets changed at all the whole addon may stop working (this is true for all part but this is the one you'll risk to break), to prevent this I decided to merge the two pieces to make it a little easier for users with no programming experience.

Download

As you see you are supposed to place the whole thing below the groups part and at a certain distance of the left side of the document, this is the same for all items so just make sure they are at the same distance from the left side as all other items in your other groups. Do the same with the name of the group compared to the names of the other groups, in the programming language used for WoW addons (lua) whitespace is very important.

The result of these modifications in the code is that you'll get a group only containing 2 ink glyphs, you can then add all other glyphs to a 1 ink glyph group. After doing all this you can set your prices a lot more precise than you could previously.

Now I better stop writing before my brain melts from all this code...

Sunday, 13 September 2009

Learning Auctioneer: The Basics

Here you go, as promised, the second post in the Learning Auctioneer series. I apologise for it taking so long but here it is.
So lets start with the first thing you see when you open auctioneer, the search window. Sorry about the crappy quality and the small size, I've spent about an hour trying to find a way to fix this but had no sucess so far. So you will have to click the picture to see what I mean.


On the top left corner within the red box you see a bar with a play button and a few other buttons.
Start Scan: The play button allows you to start a full AH scan that will gather all price information of every item on the AH and store it. This will let you easily see how much an items average value on the AH is by just mousing over it. That way you can easily price your items, though I suggest you also check wowhead and search for it on the AH to see if the auctioneer data is correct.

Stop Scan: On the left there is a "stop" button that (pretty obviously) lets you stop the current scan.

Pause Scan: To the right of the Scan button there is a pause button. Could anyone tell me what it's used for? Yes Timmy, that's correct. It lets you pause the scan.

GetAll Scan: The fast forward button to the right of the pause button lets you do a quick GetAll scan that should take about 2-3 minutes. If I understood it right it will be exactly like a normal scan but faster. Thanks to Jonathan Hunt for telling me what it does and also giving me this link.

I have no idea what the magnify glass buttons does but I have been doing fine without it so I guess they aren't very important. Or at least not necessary.

As you see I have made a search on "Rituals of The New Moon", a nice inscription made book that lets you turn into a wolf.

If you look above the search results you see a yellow bar where I have made some markings.

The # Symbol: On the left side of the bar, marked with pink, you see a "#" symbol. It shows how big the stack is. As Rituals of The New Moon is not stackable it will always show 1 but when it comes to stackable items like adder's tongue it can show between 1 to the maximum stack size.

The Green Fields: Both to the right of the "#" symbol, down in the right corner and a bit down to the left there are three green fields, these are pretty much self-explaining so I wont bother saying anything about them.

PCT: On the far right side in a blue marking there is the PCT value. It shows how much more or less an item is priced for compared to the market value. In this example it is at 208% of the market value, the only reason I put it up for so high is that I am the only poster and I know that if someone wants the book they will have to buy it from me.
The PCT is color marked. If the value is red it's above 150%, 80-149% yellow, 50-79% green and any less is blue.

Amount of Items: Above the green field down to the right there is a yellow/white field that says "Items 1-1 (1 total)". The items 1-1 part means that on this page item 1 to 1 (as it's only one item up) are shown and the (1 total) part means that there is only one up on the AH.

Price Per Unit: To the left of the amount of items you find the Price per Unit check box. This is a really great function in auctioneer, when checked it lets you see stack prices in singles. Lets use an example. There are two stacks of goldclover on the AH, one that contains 5 herbs and one with 12. The 5 herb stack costs 6g22s while the 12 stack costs 15g. Sure, you could do the math to see which one got the lowest price per item but you can also check the Price Per Unit box. It will take the cost of the stack and split it with the amount of items contained in them and will let you see which one is cheapest.

There are several more options which will have to wait. I will still use the first picture in the future post, that's why there are some markings I haven't said anything about here yet.

If you wonder why some markings look diferents than the others it's because I felt that paint just wasn't enough so I downloaded a free picture editing program to do the rest of my markings. As you can see the marks on the bottom on the page are a lot clearer than the other ones.

Monday, 24 August 2009

Learning Auctioneer: Introduction

I'm pretty sure you have all heard about the addon Auctioneer, the addon which is considered a must have by most AH players. I have now decided to make a few posts about it. Today it will just be a short introduction (the reason to why this and all posts the last days have been so short is in the other post today) to what auctioneer is but I will get more in-depth later on.

Basically auctioneer lets you scan the AH and it will then give you the average price for an item by hovering over it with your mouse. It will also allow you to see the percentage of the average price of an item when browsing the AH, you are also able to watch the prices on the AH as price per item.

Thursday, 13 August 2009

Quick Auctions 2

Update 21/8: Added a part about the summary and craft queue part of QA

Edit: The pictures were put in pretty bad, sorry for that, but just follow them in the order they appear. If you have trouble seeing what's on them just click and they will be magnified. I also decided to put a "(PICTURE)" where I am moving on to another one to make it a little easier to read.

Hi and welcome to the first part in my Addon section. Here I will discuss all the important addons that are needed to make the process of goldmaking faster and easier. Today we'll start with "Quick Auctions 2".

Basically it's an addon that posts your auctions and cancels your undercut ones, I can't describe how great it is as a scribe, but it's a little more complicated than that.

The big diference between quick auctions and quick auctions 2 is how you configure it. In the original version you configured it from the chatbox where a command like "/qa undercut 25s17c glyphs" would set the undercut amount to 25s and 17c for all glyphs. In the new version there are no premade groups (like glyphs where all glyphs are gathered) so you'll have to make them yourself, somthing I'll show you later.

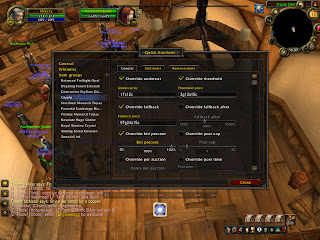
First you open the configuration window by writing "/qa config" this is what you should get (PICTURE). It's not great quality (my graphic card is broken and I should get a new one in just a few days), but you should be able to recognise most of it if you use it yourself.
These are the general settings that are true for all items unless you want to override them (we'll come to that later), but the only thing you have to care for right now is the "Smart undercut" checkbox at the top. I suggest you uncheck it as if you don't it QA2 will round all your auction prices down to the nearest gold which can be pretty bad when you are selling glyphs.
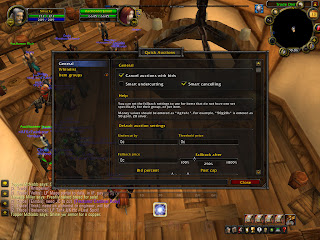
On the left side there is a "item groups" button, when you click it you'll get this window (PICTURE):
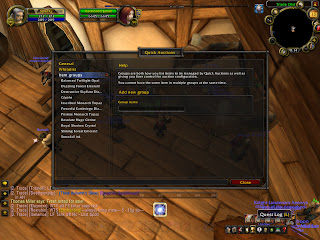


Here you'll write the name of your new group (I reccomend glyphs if that's what you're going to put in it). After that you will come to this page (PICTURE)

Here you can do all group specific settings.

First you'll have Undercut. First you check the "override undercut" box, this allows you to override the general settings that you saw earlier and you'll have to do this to every setting you want to change, then you can change the undercut amount of your glyphs by enering the amount as for example 3g52s19c. Just remember to fill the gold amount as zero when you're going below 1 gold (not sure if this is necessary but I can't check it right now). Then you press okay.

You'll then have Threshold. This is the lowest price your glyphs will be sold for and they wont be put up if your competitiors are bellow this price. You fill it the same way as with undercut.

Fallback is the price your glyphs will be posted for if there's no competition. I have my fallback at 97g, some would consider it high but they sell.

Now you'll get to the Fallback After slider. This is how much the price should be above your fallback before it goes down to it. so lets say your fallback is 5 g just for this example and the slider is at 500%. If the lowest priced item is up for 23g then QA2 will undercut it by your undercut value, but if the lowest priced item would be at 27g (more than 500% of your fallback) your item will be posted at 5g.

Then comes Bid percent, this is how many percent of your buyout price your bid is supposed to be, I have mine at 100% as people almost never bid on glyphs.

Then you get the Post cap. Here you'll set how many of each glyph you want to have up at once.

After that we have the Items per Auction where you can set the stack size of the items in the group.

Finally you have the Post Time, which you can propably guess is how long you want your items to be up.

The above settings works for all items in the group so be careful not to mix lots of diferent items in the same group.

Above the settings you'll see three tabs: "General", the one you are on now, "Add items" and "Remove items". Press the Add items button and you'll get here (PICTURE):
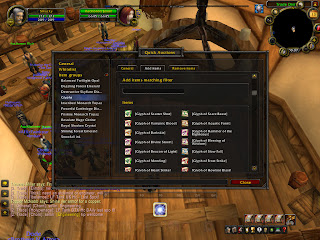
From this page you can click on items to put them in your group or just write their name in the field at the top. To add all glyphs in your bag you'll just write "glyph of" and all glyphs will be added. Now you'll just have to go to the AH, click on the auctions tab and click post at the top of the window.

That will post all your glyphs while following the restrictions you put up on the previous page.

That's it, next to the post button there is also a cancel button which will cancel all auctions you are undercut on.
One warning though, as the group will only contain the glyphs you had in your bags when you made it you should see if you have any new glyphs to add every time you make them. I just noticed that I hadn't added any of the glyphs I made a few days ago so basically, only those I had before have been posted.

Due to a request from a reader I made a short guide on the summary and craft queue as well so here you go.

First you write /tradeskill (this is still done from the chat window as it was in the previous versions of QA), I belive it can be done on any character you got.

You then log on the character who has the tradeskill you want to be used, open it and maximise all the categories. You can then go to the AH and click summary.

Choose the category the items you can make are in and click the get data button bellow the categories. You should now see red crosses in front of all items you can't make, you can also see how many you have, how many you have on the AH, how many that are up on the AH and the lowest price right now.

To put an item in the queue double-click on it and there should appear a zero on the left of the name. Just write the number of that item you want to make and they will be added to the craft queue.

You then open your tradeskill window and open the queue list by pressing the QA button on the top right corner next to the red cross close button.

If you look at the bottom of the queue (you may have to scroll down) you will see all materials needed to make the items in the queue.
Now you'll just have to click the items in the queue to make them.

The nice thing is that you can search your queue at the same time as you search the ordinary trade window making it a lot faster to find a specific item.

Another guide (with pictures!) on the summary and craft queue features is this great post at the Just My Two Copper forums.